Saturday, 1 November 2014

341
Photography silhouettes means photographing an object in front of a bright background. Objects are placed such that its shape is only a dark shadow. Generally silhouette photographed in front of the sun or other light sources, but some are taken in the water. The object was left black and appear only through the outline only. Silhouette photography is superb techniques to describe the mystery or emotion through a simple but effective way.

One thing about this type of photography is that it does not reveal a silhouette images with lots of detail but to give up some of his picture to the imagination of those who see. Many novice photographers are ingintahu how to create a nice silhouette. Here are some techniques that can help to get a magic touch in capturing the shadows.

Set Object

The first and most basic thing to remember is -tentu- placing objects in front of a bright light. Nice silhouette can be generated when there is only one source of light behind the object. Bright light is to be covered by the object to keep the ratio of the exposure. Choose an object that looks clear and crisp when placed in front of the light. If the object is a human, you can try to highlight the shape of the face (nose, lips, eyelashes, arms). You can also try to separate the detailed outline of the object instead of making a straight flat. That way it would be interesting siluetmu photo.

Lighting In Silhouette Photography

About the lighting, you must make sure that the built-in flash on your camera is turned off. Try to improve the lighting in the background rather than the object, because the object is to be made without damaging the dark background. If there is too much light, it will illuminate the object and make the details visible, not the shadow. Conversely, if there is not enough light, then the background will look gray and ruin the silhouette. The best way to organize this kind of lighting is to make sure the background is brighter than the object.

Because a total silhouette is sharp images and powerful, you can also consider the partial silhouette where there is little detail of the object that touched the light. This will make the silhouette look more three-dimensional and real.
062
Exposure lock

Once you have set an object in the right position and adjust the lighting, the next step is to set the frame and lock the exposure based on the background, not an object. You can do this by pointing to the camera metering light areas of the photo and take a reading of the exposure by pressing the shutter button half way (and not released). By doing this trick, your camera will think that the lighter part of the photo is located in the mid tones. Then the darker parts will be exposed as a shadow. Meanwhile, keep in mind that the shutter measurements shall be taken away from the bright sun light or other light source to obtain proper exposure.
This will make the object under-exposed and dark even completely black. Some digital cameras have a metering mode 'spot' or 'centered' that you can use to help gain exposure to the entire silhouette basis. Also make sure there is no light source and camera object.

Sharpen Focus On Object

Focus on the object and not the background. This will ensure the objects appear sharper, not opaque, and give perspective to the silhouette. Come closer to the object so that you can put the most powerful light behind the object, and you can change the angle of the photo to get a variety. If you and the object are equally unable to move, then try zooming.

Lastly Tips

Most photographers use the time around sunset because the sun makes the sky appear brighter than the surrounding circumstances and can produce better contrast. Some photographers use a narrow aperture (figure f / stop higher) to be able to capture the whole scene in focus. Use Aperture Priority mode so you can control the aperture and shutter speed to hand over the camera. Also recommended to use a lens hood lens flare that do not fit in the frame.

6 Tips to Make Photos Levitation
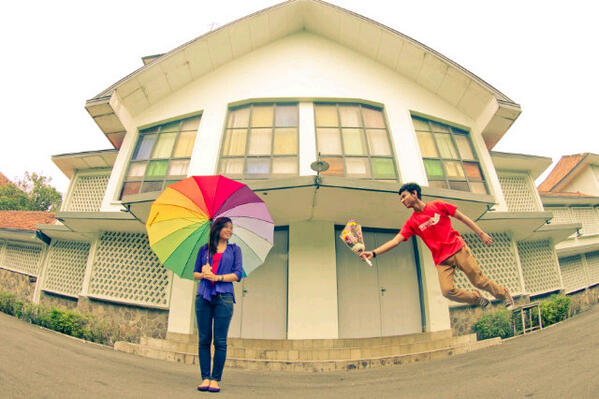
  Currently among young people Indonesia is booming a photo technique called levitation photo that was popularized by the photography community Levitation Hore.

What is a levitation photo? levitation photo photography is a technique that makes someone / something has the impression as if it floats to fly without the use of tools

Well how can I make someone or something is seen flying? Generally levitation done by jumping, but not the regular jump. Here are 6 tips on basic techniques levitation photo:

1. Different Levitation Photos With Jump Shot Photos (Photo Jump)

Although almost similar and use similar techniques, levitation photo if done right will be noticeably different from the picture jump shot. The essence of the technique is the levitation photos make someone look as natural as possible in the air, so as if the person doing the activity in the air which is usually done on the ground.

Levitation technique is a combination of photos and concept photos so the stronger concept of a photograph and the more powerful the more powerful technique photo also Levitasinya effect. Concept photos here is a blend of body poses, facial expressions, clothing or accessories that are used and the Neighborhood.

     Body Pose jump shots that are usually raised shoulders, chest out, legs folded perfectly, arms and legs move freely or look unnatural, messy hair.
     Facial expressions that are usually too cheerful jumps shots, wide open mouth without meaning, expression was seen jumping efforts (eg bent down).
     Clothing / accessories that are usually messy jump shot, as well as bags and accessories Necklace looks unnatural.
     Surrounding environment also influences whether the picture is seen jumping or seen flying? For example, in the picture there is the appearance of a chair or anything that makes us think the logic of these people are jumping in the chair, then the effect will be reduced levitasinya.

For photo technique itself is very simple, generally only rely on high speed (at least 1/250) and making angles are low angle (photographed from below) in addition to the required well enough light so that objects do not nge-blur photos. Because of this simple levitation photo technique can be applied to almost all types of cameras including compact cameras and mobile cameras.


The philosophy is anti-gravity levitation photos, so as if the person can float without effort like Superman. So if the scene in the photograph is the bounce it is not a levitation as he flew result in thrust (bounce) because it could not fly due to anti-gravity.

2. Not Originally Jump Levitation Photo

In the example photo on the tips first visible body poses affect whether this includes or included the Jump Shot Levitation, so do not look the Jump Shot poses her jump had to be determined first before jumping to fit in the air is not too much so as to make the limbs move so jamming blur. So before we jump on the first imagining levitation photo tesebut what scenes would there? later pose body will adjust.

Logically legs look too bent or pose less natural look impressive people jumping so that the necessary guidance on how to bend the right leg to make it look levitation.

3. Motretlah From the Bottom (Low Angle)

Because the technique is generally performed levitation photo by jumping and not everyone can jump high, the photographer should take pictures of the bottom (low angle) this will make the models appear to fly high and also makes visible part with the ground so that the effects will be felt levitasinya .

Here is the difference levitation photo photographed from above (high angle) and from below (low angle), see if motretnya from under the model looks to fly high and separated from the soil surface so that the effect levitasinya increasingly felt.


4. Motretlah When Models Up to Top

There are several stages when a person jumps, 1) Up to the top, 2) Stop in the air when the cusp (hovering) and 3) down to the bottom.

     The most ideal stage for levitation photo is when the model went up, because at this stage tend to be a neat haircut, clothes were also still looks neat.
     When hovering stage models, hair and clothing will tend bubbling action and reaction from the effects of gravity so it will look less natural.
     When a model falls down on stage, the messy hair and clothing will go up because of the wind so ketiup levitasinya effect is less pronounced.

As a complement, to the hair and clothes do not fall apart easily, paper clips can be used to clamp the skirt or dress and use gel or hair spray or wearing a hat that hair is not easy to fall apart.

5. Photos Levitation by Digital Engineering

Hooray community Levitation, levitation allowed to produce images with any camera and any way, one of them by way of digital engineering (Photoshop Trick). In this technique, a model berlevitasi not to jump, but by using tools such as chairs, tables or other pads to support the body while posing as if he were levitation later on the computer the tool to remove the image processing software such as Photoshop. Therefore called Photoshoptrick.

This technique is very useful for some conditions:

     The model has limitations for jump (overweight or being injured foot)
     Concept photos that are too extreme so it is difficult to do if the jump
     The safety factor when jumping (slippery floors, wear a long dress or wearing high heels)

6. Talk!

Make levitation photo that has a story, so do not just pose a regular fly. The more telling picture the more interesting photograph. Wear is also an accessory that supports the story. Examples of such levitation photo that tells flirting partner, was a romp, was taking out the trash and others.

6 Tips to Make Photos Levitation


Levitation Asiknya it can be done anywhere, such as in toilets, market, school, home, or office campus. Try levitation in places with a story that adjusts the location.
Purple Clouds ????
Making light source night seemed to glow like a star making our night photos look better. This effect is usually called a starburst effect. To create a starburst, the fundamental thing we must understand is making the aperture as small as possible, which means that we should use a large aperture number (f / 11 to f / 22) and should utilize a lens that has a shorter focal length.

Why should it be like that? well, it will be a long explanation. In short is in the physics of light will experience diffraction (spread) as it passes through a narrow hole (narrow hmm ...). The nature of the propagation of light is what makes the light source (lamp, moon, sun) will look luminous and has a tongue, tongue amount will depend on the number of blades (blade) aperture in your lens, see spec lenses you have, there will definitely be written "aperture blade ". While the answer to why you should choose a large f number and focal length are more pendk, please read the article Understanding Numbers and Understanding Lens Aperture in Aperture.

If still unclear, please see the following picture:
Starburst lampu malamThe image above shows, the smaller the aperture (the larger the f number), the tongue will get maximum light. Meanwhile, in a small f number, the visible light source with no burst at all.
Photo Tips Starburst Night:


lite-bright

Use a Tripod - Photographing the night with a large f number, eg photo above with f / 18, making the shutter speed will be very long, over 25 seconds BHotel photos why ?. So make sure you use a tripod so that the images do not like painting graffiti.
     Note the camera settings - To type of photos like this, use a large f number: f / 11 or greater. Set the ISO at a low rate, below 400, because we are going to shoot long exposure. You can use the manual mode or aperture priority, which clearly note the number the camera's metering. For shooting at night as there is a tendency to be the result of over-exposure (too bright), so use exposure compensation figure vary depending on the surrounding environment, try to use as under 1 stop early and adjust afterwards.
     Setting Focus - With a large aperture number, we will not focus too dizzy to think about, but if you want to safely take the focus point manually, or set at infinity.
     Take advantage of the alerts highlight the camera - you know? The bling-bling, you know the warning that appears on the LCD when we are shooting a bright subject.
     Start Photographing - and do not be lazy to repeat and change the settings if the results are not as you wish.

Okay good luck.
tips on photographing outdoor, today many hunting activities are performed outdoors with a variety of diverse and interesting concepts to follow. Photographing anything during the day in the sun need to consider several things.

It is true that a lot of light will allow us to take pictures. However, if the light is too strong nor necessarily get a good photograph. Especially when we are photographing models or portrait photograph, we will face some obstacles in the way of taking pictures outdoors or outdoor.
Teknik Fotografi Outdoor
One of the constraints of human photographing outdoors is hard object looks natural. What often happens, models or other objects would be exposed to the sun glare that often squinting. Moreover, if we do not pay attention to how the outdoor shoot, we also often get too strong shadows in some parts.

You are free to take pictures at any time outdoors, but to get better results, it's good to listen to some of the following outdoor shooting techniques.
Tips on Photographing Outdoor or Outdoor

1. Consider Lighting Around
Tips on photographing outdoors the first is with regard to the character of light in the vicinity of the shooting. We must pay attention to the weather conditions at the location. If weather conditions are unfavorable / do not support, we suggest you look for another time.

There are three kinds of lighting that is great for outdoor shooting. Key light, Fill light and back light. The third phase of this natural lighting you can use to take pictures.

2. Trying Different Light Conditions
after recognizing the character of the light at the location shooting, outdoors photographing technique further to keep in mind is to experimenting with existing light. Do not let the empty time just to wait for the moment the golden hour, try to take advantage of existing light at that time to try to take pictures.

3. Note the Direction Sunlight
How to shoot outdoor next is by watching the direction of sunlight on location shooting. Sunlight can be friends as well as enemies when shooting outdoors. You have to pay attention to where the sun is the light.

Ever hear vocabulary backlight? yes, it happens when we are shooting outdoors with sun-facing (object back to the sun). However, when the backlight is able to position precisely precisely to get a photo with beautiful lighting.

4. Use Flash As a Fill In
Not be a strange thing when shooting outdoor in daylight using flash. Functions flash when shooting in daylight can to avoid backlight object when the source of light. Flash will serve as a fill-in to illuminate objects that are not directly exposed to sunlight.

On such an occasion, you can take advantage of your camera's features are called flash compensation. Where the flash compensation function is to control the intensity of the light output by the built-in flash.

5. Take advantage of Reflector
Tips on photographing outdoor next is to use a reflector. Relektor will serve to reflect light toward the object to be photographed to illuminate the affected part of the shadow. The principle of its own reflector to reflect light, so any kind and bentukanya we can make as a reflector.

6. Take a picture in place of the Pacific
By shooting in the shade we could avoid the strong shadows to the object being photographed. This outdoor shoot tips may also help the object / model does not overheat and sweat quickly. Although the shade, but try these places to get enough light. Avoid uneven light when photographing the model in outdoors, because it will cause face get half a different light.
saghyta anggraeni 
MODEL OUTDOOR SHOOT TIPS.

A beginner in the field of photography usually start the picture with the object - the object is easy. One is using the object model. On this occasion we will discuss a few tips for photographing a model. When we hear the word models, we are always in the shadow of the figure of a beautiful woman, young and has a nice body. The term is actually incorrect, because the definition of a model is a person who becomes an object in a photo. Ranging from infants, teenagers, parents to grandparents. Even an animal can be called a model.
For photographing models, we must first have a camera. Each type of camera can be used in this shoot. A little mention of the tool, ideal for shooting a fashion model wearing a camera lens can be removed exchange. Thus, in the process of shooting we can make a close up photo using a telephoto lens or a zoom lens. But if you just have a pocket camera types or just using the camera on your mobile phone facility, it's not a problem.

To take a picture of a model, we used a technique close-ups. A close up photo is a photo showing part of the model of the body starts to head up the waist. It also is the term extreme close-up, which has the meaning of the photo showing the face of the models. It could even be just the eyes alone. For extreme close-up shooting better if done with the type of camera lens can be removed exchange. And for the topic of this discussion, focusing on shooting close-ups by using all kinds of cameras. Because this topic is more priority to those of you who do not understand the science of photography and want to learn about photography techniques.

Here are some tips for photographing models.

CAMERA

All types of cameras can be used, either digital or conventional type (movie camera) even the camera on the phone. If your camera has a zoom facility, use the zoom or telephoto position. So your distance with a model that you can kinda far portrait. And try not to take pictures with the lens at wide angle position (lens width), especially for close-up shooting. Because in addition to the distance you are closer to the model, the results of the model's face photo will look wider because of the distortion. Examples of distortion effects can be seen if you look in the mirror in front of the convex glass.

TIME

If you take pictures by utilizing sunlight or outdoors, ideal for shooting time is hours 8-10 am or 3-5 pm. Because at the time - the time the sun is still soft. So that the shadow that appears at the bottom of the eyelids, nose and neck are not too hard or soft.

LIGHTING

Point the light that comes from the sun in the right or left side of the model (theory side lighting). If sunlight is not hard, you can put the model with the face parallel to the direction of the sun. It is during the eye of the models do not shrink from keeping the arrival of the sun. In anticipation of the face is darker because it is not exposed to sunlight, you can use white paper or white cloth which is created facing a rather dark part of the face. The white paper or white cloth serves as a reflector or reflective media from sunlight. In the field of photography technique is called fill-in light (fill light)

Important: Do not ever you shoot models with camera position against sunlight (sunlight from behind the model). Because the light meter in your camera will read the light that comes from the sun instead of the light in the area of ​​the model's face. And the resulting image appears dark while the model's face model of the rear light (silhouette).

COMPOSITION

Place the model in the middle of the camera frame. Position the camera parallel to the model. Do not be too low or too high of a model. You can set it through the viewing window (view winder) on your camera. Use the theory of what you see what you get. So what you see in your camera's viewing window, it will be recorded in your photo.

For models that have a face width or fat body posture, position the face slightly oblique to the left or right side. Do not be facing straight into the camera. This is to reduce the impression of fat or the width of the face models. So the image of the photo will look to one side of the cheek slim little model because the model facing slightly oblique to the left or right side. Because usually every model especially women want to look thinner when photographed.

COMMUNICATION

Usually people that we make the model in the photo will feel stiff at first shooting. To break the ice, and so the models feel comfortable and relaxed when we portraits, try to take the model of a chat. If you need to do a photo shoot with a relaxed chat. Usually the model will be styled with ease after ½ hour walking photo shoot. Therefore, if you are photographing a model by using a film camera, the first ½ hour you take pictures with the camera without the film. But you acted like they were photographed on film. Once you feel relaxed and models have started a nice pose-pose, you just fill in your camera with the film. This is done to avoid the film is wasted because the resulting image is not good. But do not forget, do the above without the knowledge of the model. While not a problem for digital cameras. Because the files are not in use can be deleted.

Important: When the shooting time no pose or style of the model is not good, you do not ever say "ugly" on the model. You can replace with the phrase "Please pose another dong, that it had been ...". Psychologically, if you say the poses that appear ugly to say the models directly in the model, will feel confident enough to pose again. In fact, she could lose her mood. Essentially any pose that displayed the models you say nice, even if you do not like. That way the models will feel confident and pose-pose, the better.

LOCATION

All places outdoors (outdoor) can be used for this shoot. Origin of light conditions in a well-lit location that is used for shooting. Example location: Park, home perkarangan many shady trees, fields and others. Try to use sites that are not too crowded. Because of that we highlight in this shoot is the model. Do not let the background more attractive than his model. Choose colors that are shaded or soft, eg green, yellow. Do not use the color red. Because red is stronger than skin color. In addition, the skin color will be affected and become paler or slightly bluish.

Actually there are many that can be delivered in this topic. For a while it helps you learn first tips above. On another topic of discussion, we will continue the discussion of tips photographing models.

Bokeh is a means blur in Japanese. But how a photograph can blur called creative and charming, the following simple tips and tricks from Shilpa Venkat from Pune, India, to create stunning bokeh photos.

1. Location of the well is outdoor or outdoors

10 Easy Tips to blur Photo Creative Outdoor Night
Photo Credit: Shilpa Venkat

Start at the front of your house. But it is better if the exit roads. The street is the best place to shoot photos bokeh and will find a variety of lights at night

2. Trying to be creative

car

Photo Credit: Christian Yves Ocampo

Do not just focus on the camera and without thinking, investigations are required to make photograph bokeh. find a different way so that the images look attractive and more prominent.


3. The best time to photograph bokeh is at night

light
Photo Credit: Linc

Not to say that both during the day but at night will be able to color, a pattern that looks more attractive bokeh

4. Look for the right lighting

umbrella
Photo Credit: Fabrizio Q
The light was the most important for bokeh photos. if the background would be perfect flame patterned bokeh. But if the light is less bokeh will certainly be less good.

5. Search and exploration of the exact location

a man
Photo Credit: Brandonhuang
The biggest challenge is to avoid moving subjects. An example of a good location is the obvious subject of traffic lights at night, the lights of the vehicle and traffic.

6. Bring items from home that are likely draw

10 Easy Tips to blur Photo Creative Outdoor Night
Photo Credit: Nazirulmubin
 
One of the great subjects to be used is glass. If you do not carry it then you can use the objects in the street like a car or other interesting things to the foreground.
 
7. Use a shutter speed or aperture lens fastest

10 Easy Tips to blur Photo Creative Outdoor Night
Photo Credit: Shilpa Venkat
The lens is fixed and is good for bokeh 50mm prime lens F.1 / 8, f / 1.4, or f / 2.8, contrast with zoom lenses, prime lenses work good..but could also use a 35mm prime lens, lens even f 70-300mm /2.8 also can provide good bokeh photo. For those who only have the 18-55mm kit lens can also be used but it sure 18-55mm zoom lens aperture to f / 5.6 and try it out. The number of f is greater, the larger the aperture the greater the incoming light to photograph bokeh at night.
 
8. It is better to use the manual focus

10 Easy Tips to blur Photo Creative Outdoor Night
Photo Credit: Shilpa Venkat

If the auto mode can be very difficult. the camera will be difficult to take the focus. Manual focus is the right choice.

9. The composition is very important

10 Easy Tips to blur Photo Creative Outdoor Night
Photo Credit: Bryan Leung
Photographing any termauk bokeh photo photo composition should be good. continue to check kompoisi your photos, use a tripod when shooting bokeh at night in order to focus and perfect composition.

Beware Bokeh photography can be addictive especially with different concepts and new ideas and to incredible photographs.